
 Pin
Pin
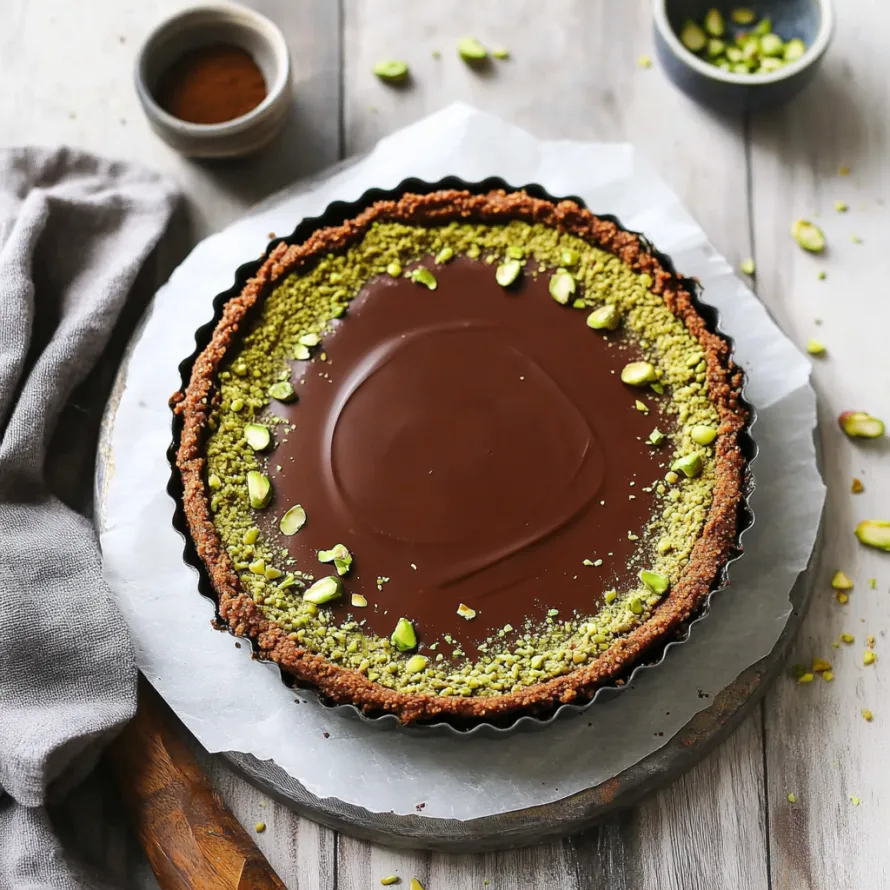
This completely oven-free chocolate tart packs amazing taste without any baking needed. You'll love how the creamy pistachio middle sits perfectly between a rich cocoa-infused base and smooth chocolate topping, giving you tons of different textures in every bite. It feels fancy but isn't loaded with junk. Great for parties, this dessert catches everyone's eye with its pretty green layer while being surprisingly quick to put together using just a handful of items.
I came up with this idea when I needed to bring something to a dinner where everyone ate differently. Now chocolate and pistachio together has become my go-to treat for get-togethers. My friends always ask me to make this tart and they're always shocked when I tell them how easy it is to whip up something that looks this fancy.
Key Components
- Pecans: They give the crust its brownie-like taste and naturally buttery feel.
- Cocoa powder: Brings that deep chocolate kick to the base without needing extra sugar.
- Soaked pistachios: Turn into a super smooth filling that makes the standout middle section.
- Maple syrup: Adds just enough sweetness that works with everything else instead of taking over.
- Dark chocolate: Makes the top layer rich and interesting with lots of flavor notes.
- Coconut milk: Helps create that silky ganache while keeping everything plant-based.
- Vanilla bean paste: Adds those tiny flavor hints that make the pistachio layer pop.
- Optional matcha powder: Makes the green color pop more without changing how it tastes.
- Flaky sea salt: Gives that perfect little crunch against all the sweetness.
Crafting Your Showstopper
- Making The Base:
- Start by putting parchment in a 9-inch tart pan that has a bottom you can push out for easy serving later. Throw your raw pecans, plain cocoa powder, and a tiny bit of sea salt into a food processor. Give it several quick pulses until you get something that looks like rough sand with some slightly bigger bits for texture. Pour in some maple syrup and blend again until everything starts sticking together when you press it between your fingers. Dump this mix into your lined pan and use the bottom of a spoon or measuring cup to push it down firmly across the whole bottom and a bit up the sides. Make sure it's the same thickness everywhere so your slices will hold together later. Pop it in the fridge while you work on the next part.
- Whipping Up The Pistachio Center:
- If you didn't soak your pistachios overnight, you can cheat by pouring boiling water over them and waiting an hour. Drain and rinse them really well - they should look a bit puffier now. Throw them in a strong blender with maple syrup and vanilla bean paste. If you want that green color to really stand out, add some matcha now too. Start blending slowly then crank it up, stopping now and then to scrape down what sticks to the sides. Keep going until everything turns completely smooth with no little bits left - this might take a few minutes depending on your blender. When it's done, it should spread like natural peanut butter.
- Getting It Even:
- Grab your cold crust from the fridge. Using a flat spatula, carefully spread the pistachio mixture in an even layer all the way to the edges. Take your time here to make sure it's level everywhere so your chocolate layer will look nice on top. This green layer should be about 1/4 inch thick all around. Put the whole thing back in the fridge while you make the final layer. The cold helps this middle part firm up a bit, which makes adding the chocolate easier without messing things up.
- Finishing With Chocolate:
- Put your chopped dark chocolate in a bowl that can handle heat. Getting the coconut milk right is super important for smooth chocolate, so warm it in a small pot over medium-low heat until you see tiny bubbles at the edge but don't let it boil. Right away, pour this hot milk over your chocolate and just let it sit for three minutes without touching it. This slow melting is much better than stirring too soon. After waiting, start stirring from the middle outward with a rubber spatula, keeping your movements slow and gentle until everything looks glossy and smooth with no chocolate pieces left.
- Putting It All Together:
- Get your tart with the crust and pistachio layer from the fridge. While your chocolate mix is still fluid but not hot, carefully pour it over the green layer. Gently tip the pan around if needed so the chocolate covers everything right to the edges. Right away, sprinkle chopped pistachios and a little flaky salt on top if you want - you need to do this before the chocolate starts hardening so they'll stick. Put the whole tart in the fridge uncovered for at least four hours, but overnight is even better to make sure everything sets up properly.

Tasty Serving Ideas
This fancy tart works for both casual snacking and dinner parties depending on how you serve it. For everyday, just cut a slice and enjoy it as is - the mix of flavors stands on its own. When company's coming, make it extra special with a small spoonful of whipped coconut cream on the side and maybe a few fresh berries for color. During holiday time, try serving it with a tiny glass of amaretto or coffee liqueur that goes great with both the chocolate and nuts. The tart cuts cleanest when it's cold from the fridge, but tastes best if you let it sit out for about 15 minutes before eating.
Fun Ways To Switch It Up
This basic recipe can be tweaked in lots of ways depending on what you have or what you like. If pistachios are hard to find, try cashews instead for a different but still tasty middle section. Adding some orange zest to the chocolate layer creates a nice bright flavor against all that richness. For special times, try putting a thin spread of raspberry jam between the pistachio and chocolate for a fruity twist. Coffee lovers might want to mix a teaspoon of espresso powder into the chocolate to bring out even more flavor and add some complexity. During winter holidays, try mixing a quarter teaspoon of cardamom into the pistachio paste for a warm, festive spice kick that feels really special.
Recipe Q&A
- → Can I swap homemade pistachio paste for store-bought?
- Totally! You can use premade pistachio cream (crema al pistachio) instead. Just double-check it's dairy and honey-free if staying vegan. Pistachio butter works too, but it might make the filling thinner.
- → Why is soaking and peeling pistachios important?
- It makes the nuts blend smoother and gives the paste a bright green hue. Skipping peeling is fine for color and texture but makes less vibrant paste.
- → How do I get thick coconut cream for the chocolate sauce?
- Pop your full-fat coconut milk cans in the fridge overnight. Once cold, cream will solidify at the top. Scoop that out—you'll likely need two 400ml cans for the amount needed.
- → What if I skip the pistachio layer?
- That works too! You can stick to just the crust and chocolate ganache. Increase your ganache amount by about 25% to ensure the tart fills properly.
- → How far ahead can I prep the tart?
- This tart works well ahead of time. Store in the fridge for up to 5 days or freeze for up to 3 months. To serve from frozen, thaw in the fridge overnight.
- → Is matcha necessary for the pistachio paste?
- Matcha powder adds to the pop of green but doesn’t change the taste. Skip it if unavailable or unnecessary for your preferences.